Editing Mode:
The "Edit alignment" function allows gaps to be inserted or deleted for adjusting the alignment manually.
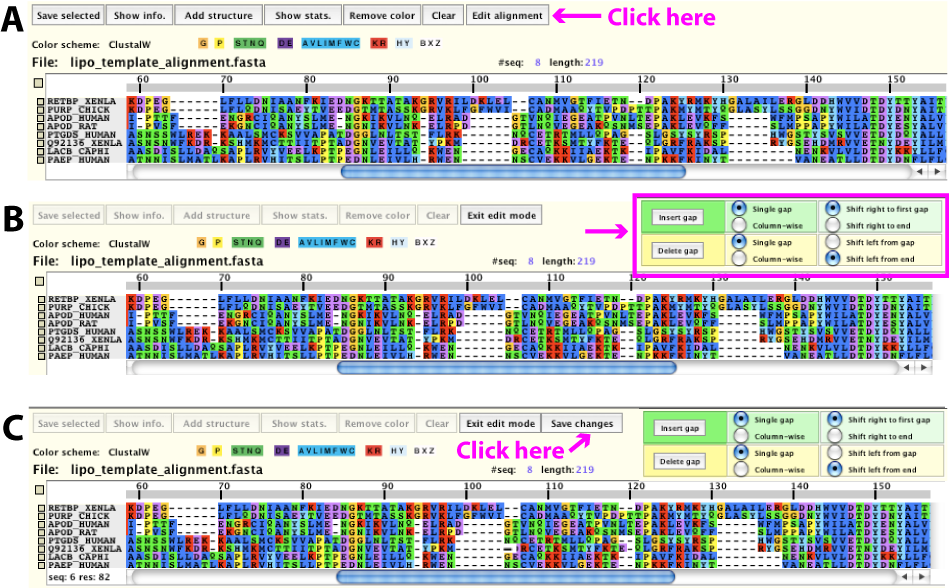
To enter the editing mode, click on the Edit alignment button (Figure 1.A).
To exit the editing mode, click on the Exit edit mode button which toggles between
"Edit alignment" and "Exit edit" mode as shown in Figure 1.B. The "Save changes" button
becomes available when a change is made to the alignment.
Figure 1: Edit mode.
Four editing modes are available:
- Insert a single gap and shift the first non-gapped block or the rest of the sequence to the right.
- Insert gaps column-wise and shift the first non-gapped block or the rest of the sequences to the right.
- Delete a single gap and shift the first non-gapped block or the rest of the sequence to the left.
- Delete gaps column-wise and shift the first non-gapped block or the rest of the sequences to the left. These editing modes are chosen from the edit-option panel as shown in Figure 1B. Each of these modes is explained in detail below.
Insert/delete a single gap:
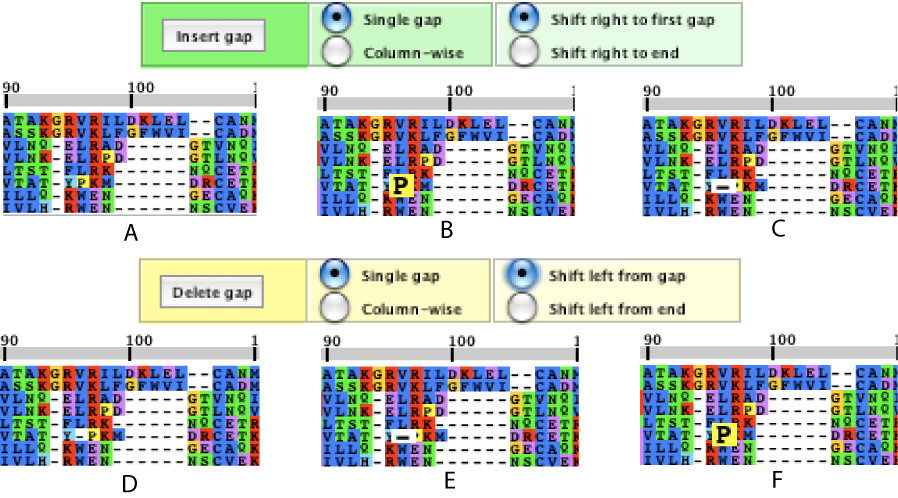
Figure 2 illustrates the process of inserting (from 2.A to C) and deleting (from 2.D
to F) a single gap within the alignment. Note that the Single gap and Shift right to first
gap radio buttons are chosen. Select the position where you want to insert a gap within the alignment.
Note that you need to select a non-gap position to be able to insert a gap. The selected position is
enlarged as shown in Figure 2.B. To insert a gap, click on the Insert gap button (Figure 2.C). Notice
that all residues to the right up to the first next gap (the first non-gapped block) were shifted by one
position and the length of the next gap region became one gap shorter. If there are no gaps between
the selected position and the end of the alignment, then all residues to the right will be shifted by
one position and a gap will be added to all other sequences at the end of the alignment.
If the Shift right to end radio button is selected, all characters from the right of the selected
position to the end of the alignment would be shifted to the right and a gap would be added to
the end of every other row.
The deletion of a gap is similar. With the Single gap and Shift left first block options selected,
choosing a gap (Figure 2.E) and clicking on the Delete gap button will delete the gap and all residues
in the first non-gapped block to the right will be shifted left (Figure 2.F). Note that the residue that
is shifted into the selected position will be enlarged. If the Shift left from end radio button is selected,
when a gap is deleted, all characters to the right of the selected positions will be shifted left and a gap is
added at the end of the row.
Figure 2: Inset/Delete single gap.
Insert/delete column-wise gaps:
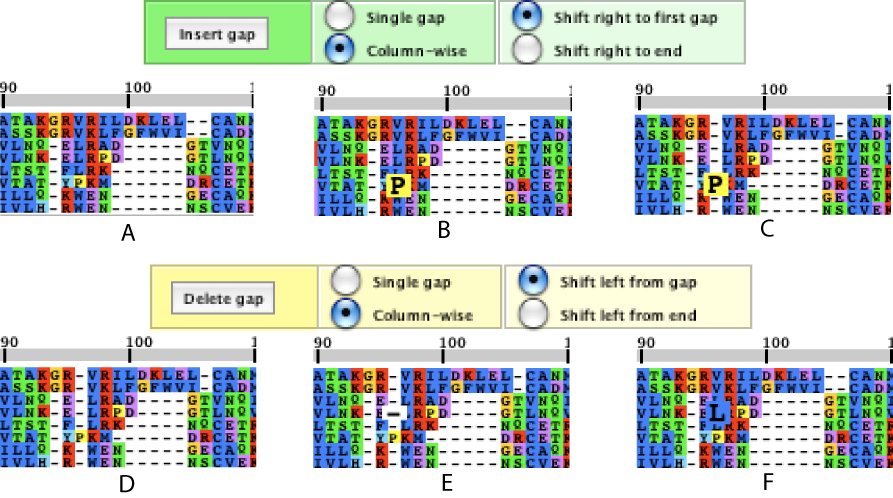
Column-wise insertion and deletion of gaps can be done similarity. To insert gaps in all rows at a position
except the row selected (effectively isolating the selected residue in its own column), select a residue to
isolate. In the example illustrated in Figure 3.A-C, we selected the residue 'P' in the 96th position,
which is shown enlarged (Figure 3.B). From the edit-option panel, we selected the Column-wise and Shift
right to first gap radio buttons. Clicking on the Insert gap button inserted gaps above and below the
selected position (Figure 3.C). Notice that the lengths of the next gap regions became one gap shorter
for all rows except for the row chosen.
To delete all gaps within a column, select the Column-wise and Shift left from gap radio buttons from the edit-option panel. In the example illustrated in Figure 3.D-F gaps were removed from the 96th column, shifting all residues in the first non-gapped block to the left. Notice that the lengths of the next gap regions became one gap longer for all rows except for the row(s) that has a residue (non-gap letter). If there is no gap between the selected position and the end of the alignment, a gap will be added to the end of each sequence to maintain equal lengths.
To delete all gaps within a column, select the Column-wise and Shift left from gap radio buttons from the edit-option panel. In the example illustrated in Figure 3.D-F gaps were removed from the 96th column, shifting all residues in the first non-gapped block to the left. Notice that the lengths of the next gap regions became one gap longer for all rows except for the row(s) that has a residue (non-gap letter). If there is no gap between the selected position and the end of the alignment, a gap will be added to the end of each sequence to maintain equal lengths.
Figure 3: Inset/Delete column-wise gaps.
Save changes:
After a change has been made to an alignment, the Save changes button becomes available as shown in Figure 1.C. Click on this button to save the edited alignment. Note that if the alignment window is closed prior to saving the edited alignment, all changes will be lost. Once the edited alignment has been saved, until another changes are made on the alignment, the Save changes button becomes unavailable.
Editing an alignment with reference to the structural alignment display:
When you are in the edit mode and if a structural alignment (see section 6.4 of SuiteMSA User's Manual) is open, changes can be made either in the sequence or structural alignment. Any changes made in the either alignment will be echoed immediately in both alignment displays.